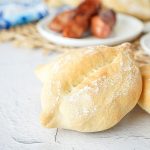
Papo Secos (Portuguese Crusty Rolls)
A recipe for Papo Secos (Portuguese Crusty Rolls) from the cookbook, Portuguese Home Cooking. These rolls are perfect for pairing with grilled sausage, sardines, or simply with butter.
Servings 2 1/2 Dozen Rolls
Ingredients
Sponge:
- 1/4 ounce (2 1/2 teaspoons) active dry yeast
- 1 cup room-temperature water 65 to 70˚F
- 1 cup (4 1/2 ounces) high-protein bread flour
Dough:
- 6 1/4 cups (1 3/4 pounds) unbleached bread flour (12% protein) plus extra for dusting
- 2 tablespoons lard or shortening
- 2 tablespoons (1 ounce) sugar
- 1/4 ounce (2 1/2 teaspoons) active-dry yeast
- 1 1/2-2 cups room-temperature water 65 to 70˚F
- 1 tablespoon (1/2 ounce) table salt
- Rice flour optional, see note
- Fine cornmeal for dusting
Instructions
Make the sponge at least 6 hours ahead:
- In a medium bowl, dissolve the yeast in the measured water. Mix in the flour until blended.
- Cover with plastic and set aside at room temperature for a minimum of 6 hours, or up to 8 hours.
- If you plan to start the dough in the morning, mix the sponge just before you retire the night before, cover, and chill overnight.
- Bring the sponge completely to room temperature (it will take about 2 hours), before using.
To make the dough:
- Place the flour in a large bowl. Use your fingers to rub the lard or shortening into the flour to distribute evenly.
- If using a free-standing mixer, transfer the mixture to the bowl of the machine; if mixing by hand, continue in the same large bowl.
- Add the sugar and yeast, and whisk until evenly distributed. Make a well in the flour mixture and add the sponge, along with 1 1/2 cups of the room-temperature water.
If you are using a mixer:
- Attach the dough hook and mix on low speed until the dough seems stiff, add some of the remaining room-temperature water, a little at a time, and mix at medium speed until you see the dough ease up.
- Gradually increase the speed to high, and continue to mix for about 10 minutes, adding in the salt as soon as you start to see the dough pull away from the sides of the bowl.
If you are mixing by hand:
- Use your fingers in a claw-like formation to incorporate the water and sponge into the flour. Mix well until it comes together in a ball and starts to leave the sides of the bowl.
- Add the salt and continue to mix, turning the dough onto itself, until the sides of the bowl appear clean. If the dough seems stiff, add some of the remaining room-temperature water, a little at a time, and continue to mix until you see the dough ease up.
- Turn the dough out on a lightly floured surface and mix by hand for 10 to 15 minutes. The dough is ready when smooth and elastic, springs back when pressed with a finger, and has a slight sheen. To test, pull off a small piece of dough and stretch it until it is so thin you can almost see through it. If it tears, mix for a few more minutes and test again.
- Place the dough in a bowl (or keep in the bowl of your mixer), and cover with a kitchen towel, followed by plastic wrap. Set in a warm, draft-free place until doubled in size, about 2 hours. When the dough is ready, an indentation will remain when it is pressed lightly with your finger.
- Punch down to redistribute the yeast and let the dough rise for 1 more hour.
To shape:
- Punch down the dough again, then turn it out onto a lightly floured work surface. Divide the dough into 24 to 36 equal-sized pieces, 2 to 3 ounces each, or the size you prefer.
- On an almost flour-free work surface, use the palm of your hand, with slightly curled fingers and medium pressure, to rotate the pieces of dough against the work surface until each piece is a smooth, fairly tight ball.
- Set 2 inches apart on a floured surface, cover with a towel, and let rest for about 30 minutes.
- On the floured work surface, flatten each ball into a disk about 1/2 inch thick and 3 inches in diameter. Dust the surface of the dough facing you with some all-purpose or rice flour (see Note).
- Using the outside edge of your hand, press a crease into the dough, as if you're going to cut it in half, but don't go completely through.
- Fold the disks in half along the crease and pinch the ends firmly, giving the dough a slight lengthwise stretch while twisting or rolling the ends to a point.
- Arrange the rolls, smooth side up, and the crease opening down, on lightly floured towels, 2 inches apart, in rows. Pull the towels up slightly between rows, so the rolls won't touch. Cover with another towel, top with plastic wrap, and let rise until nearly doubled, 45 minutes to 1 hour.
To Bake:
- Meanwhile, place an oven stone on the middle shelf of the cold oven and a shallow pan on the bottom shelf. Preheat the oven to 400˚F.
- Lightly dust the wooden peel or a baking sheet with fine cornmeal. Remove 6 rolls from under the towels and place them on the peel, facing up, with the smooth side down, forming two rows towards the edge farthest away from the handle.
- Or place the rolls on a baking sheet and place this on the middle rack of the oven.
- Pour hot water into the pan on the lower shelf, then quickly place the tip of the wood peel at the far edge of the hot stone. Using smooth, small jerking motions, pull back the peel while sliding the rolls gently onto the stone. They should stay upright.
- Bake for 15 to 20 minutes, until they are a rich golden color and sound hollow when tapped on the bottom.
- Remove, shoveling them up with the peel. Repeat, baking the remaining rolls 6 at a time.
Notes
Note from Ana: "Although my father and I never used rice flour, Alex Couto suggests using it to help maintain the center crease of the rolls; it prevents them from ballooning out, which is an effect of the humidity in the oven."