

A recipe for Australian Damper! This easy quick bread comes together with simply self-rising flour, water, optionally milk, and butter.
I first came across the inspiration for this Australian Damper recipe over on Manu’s Menu as a way to use up some self-rising flour before our move.
Damper is an Australian quick bread traditionally made while camping outdoors using the coals/ashes of a campfire or greased camp oven. Originally, it was unleavened and formed with only flour, salt, and water.
Now, milk or beer may be used in place of some of the water. Butter creates a bit of softness. Other add-ins such as seasonal grains, nuts, and herbs may also be included.
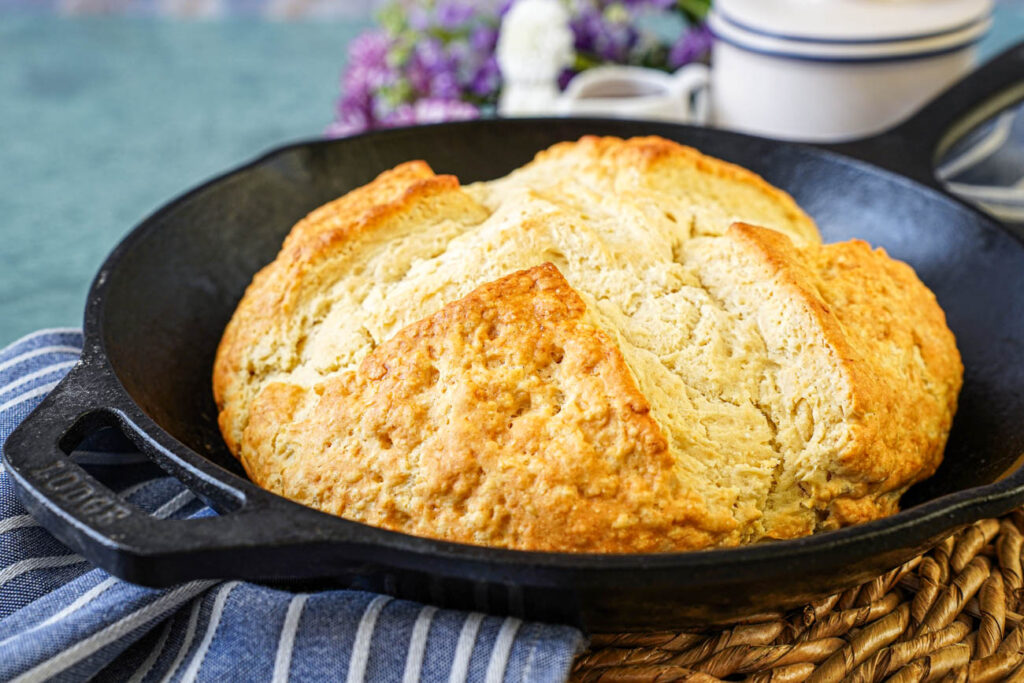
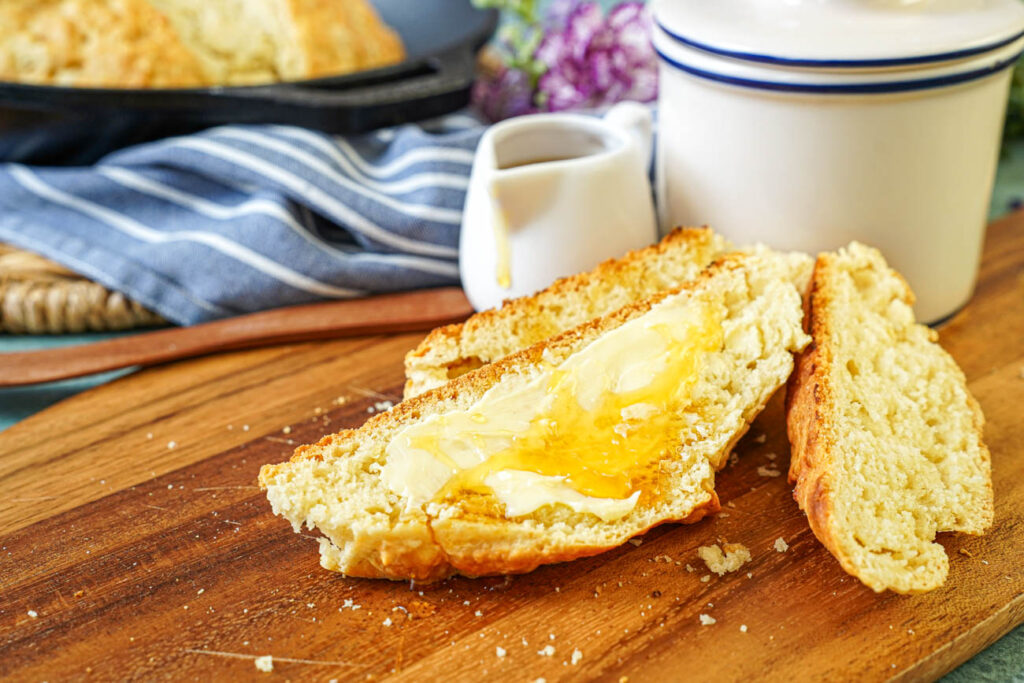
In this version, I have paired the self-rising flour with salted butter and a blend of water and milk. The result is a crisp, crumbly crust that gives way to a dense, slightly soft center perfect for holding up to butter, jam, and/or golden syrup.
Notable Ingredients
This recipe uses self-rising flour as the base to puff up the bread and create a lighter texture. If you do not have self-rising flour, you can make your own at home. For every 1 cup (125 grams) of low protein or all-purpose flour, stir in 1 1/2 teaspoons baking powder and 1/4 teaspoon salt.
My package of self-rising flour (in the United States) contains salt. If yours does not, add 1/2-1 teaspoon salt to the flour.
Golden syrup is a thick, amber colored cane sugar syrup popular in many European baked goods. It is available in the international/British section of some larger grocery stores and online.
A Few Damper Tips
Do not pack in the flour when measuring or you may end up with too much. To measure flour, gently spoon it into the measuring cup and level with a knife without pressing down. The most accurate way to measure is by weight.
If you have made scones before, cutting the chilled butter into the flour is the same technique. Use your fingertips to rub the diced butter into the flour to create a coarse, sandy texture with no pieces larger than the size of a pea.
I used a combination of water and milk in this recipe. You can swap the milk for equal parts water or beer, if desired.
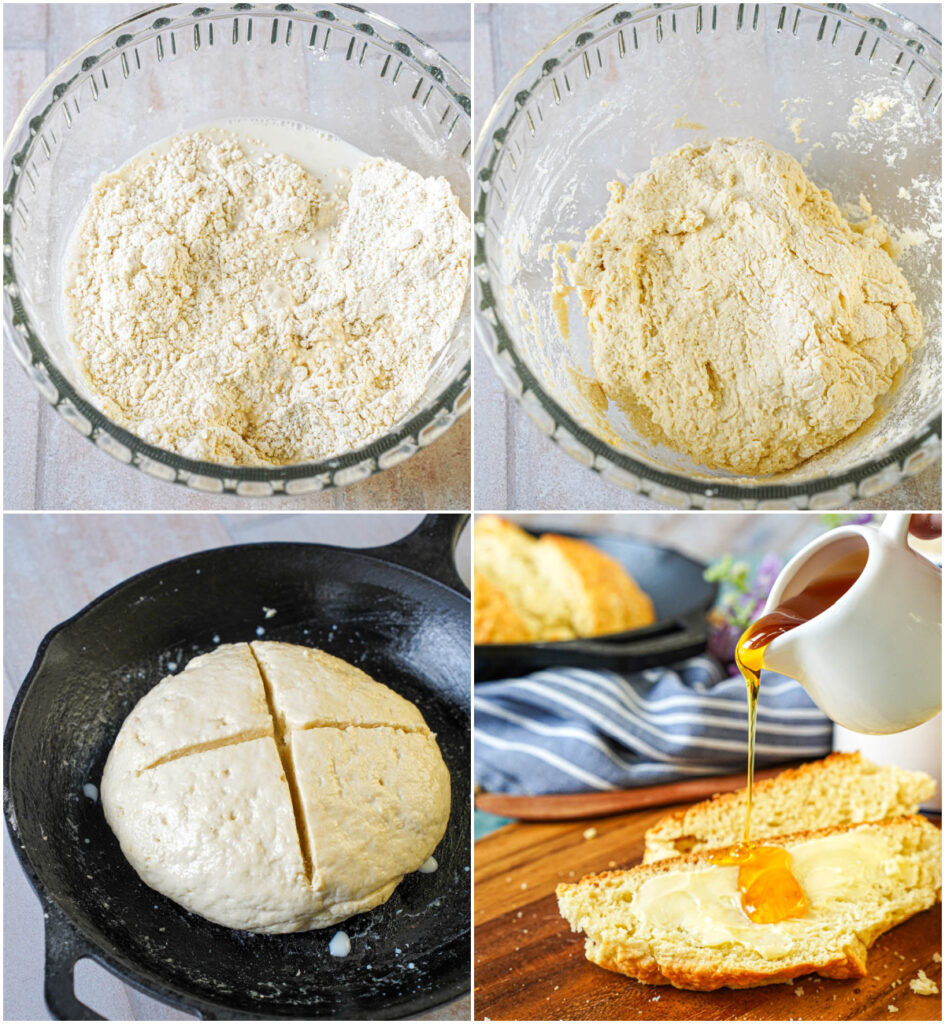
Do not overwork the dough. Mix together the ingredients just until combined and able to stay into a loaf shape. If still too dry, add a little more water. If too sticky to handle and form into a round, coat in a little more flour.
I placed the formed loaf in a greased cast iron skillet. You can also use a Dutch oven. If cooking over a campfire, the dough can even be wrapped around a stick.
Cut two to three lines about 1/2 inch (1.25 centimeter) deep across the top either in a cross or wedge pattern before placing in the oven. This will allow steam to escape.
Bake until the bread is puffed, slightly golden, and sounds hollow when tapped at the base. This should take about 30-40 minutes. Allow to cool for at least 5 minutes before slicing and serving.
This Australian Damper is best within a day of baking. Once cooled to room temperature, store in an airtight container at room temperature.
I haven’t personally tried it yet, but reader William commented below to add some liquid smoke to the dough if cooking indoors to mimic the smoky flavor absorbed from the campfire.
Looking for more Australian recipes?
Try my:

This recipe was originally posted in July 2016 and updated in May 2026.
Australian Damper Recipe
Adapted from Manu’s Menu
Australian Damper
Ingredients
- 3 cups (375 grams) self-rising flour plus more for dusting
- pinch salt or 1/2-1 teaspoon if your self-rising flour does not contain salt
- 5 tablespoons (70 grams) salted butter chilled and diced, plus more for greasing
- 1/2 cup (120 milliliters) water
- 1/2 cup (120 milliliters) milk or water, plus more for brushing
To Serve:
- salted butter to serve
- jam to serve
- golden syrup to serve
Instructions
- Preheat the oven to 375˚F (190˚C). Grease an at least 8 inch (20 centimeter) cast iron skillet or Dutch oven with butter and lightly dust with flour.
- In a large bowl, add the flour and salt.
- Cut in the butter using your fingertips until the texture is coarse and sandy with no pieces larger than a pea.
- Make a well in the center and add the water and milk.
- Use a blunt knife to blend the liquid with the flour, then form with your hands just until a dough comes together and is no longer crumbly. If still too dry, slowly add a little more water. If too sticky to form into a loaf, coat with a little more flour.
- Form the dough into a round loaf about 7 inches (18 centimeters) in diameter.
- Brush the top of the dough with a thin layer of the milk and dust lightly with flour.
- Score the top of the loaf 2 to 3 times about 1/2 inch (1.25 centimeters) deep in a cross or wedge pattern to make 4-6 sections.
- Transfer the skillet to the preheated oven and bake until golden and cooked through with a hollow sound when tapped, 30-40 minutes.
- Allow to cool slightly. Slice and serve warm or at to room temperature with butter, jam, and/or golden syrup.
Katie Crenshaw
This looks like a beautiful bread that even I can bake! It will be perfect for entertaining. I am saving this for my next dinner party.
Cookilicious
I think I had tasted this bread when in Australia..they had served it for breakfast at a restaurant..this looks good.
Kathi @ Laughing Spatula
Love the short ingredient list and how easy it would be for the kiddo’s to help with..and, well it’s bread! yum!
Immaculate
Am a sucker for all things bread. And this soda bread is no exception. Looks Delish!
Aish Padihari
I should try making this bread. Looks delicious.
Kay
Your recipe’s amazing!
I don’t have an oven so used my frying pan amd it’s mighty glass lid instead LOL. The bread turned out beautiful! Fluffy inside and crusty outside. Thanks for sharing the recipe!
Tara
Thank you Kay! So glad you enjoyed it.
Danielle
Great recipe, made it with my 7 and 2 1/2 year old they loved it. We had it warm with butter and guava jam. It was heavenly
Tara
So glad you enjoyed it Danielle! My kids are at similar ages and were also big fans. I will have to try it with guava jam next time 🙂
Haylee
Im Australian and this is a great recipe for a classic aussie dish. Sometimes you crave a damper and this one is spot on.
William
I grew up eating damper and golden syrup as a young fella and find myself still craving it in adulthood. A handy tip, (if you don’t have a campfire available) is to add some liquid smoke to the dough before baking. This mimics that smoky, moorish flavour you get from hot coals. Another traditional ingredient to add, is a couple of tbsp’s of malt extract👌🏼
J. Adams
This recipe looks similar to a baking powder biscuit recipe. Am trying it tonight for our Anzac Day dinner here in the States. My dough doesn’t look like it will rise the way yours did though. Does this one rise in the oven pretty well? What about using a pie pan?
Tara
Hi! It rises a decent amount with the combination of chilled butter and baking powder. A pie pan would be fine.